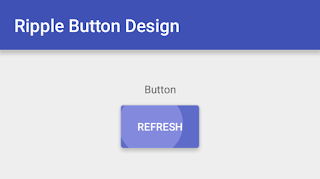
How to achieve ripple effect or ripple animation using support library in Android?
Ripple effect is the part of material design and added in API level 21. It gives the beautiful animation when a button or a layout is touched.
Here we'll implement ripple effect for:
- Button
- LinearLayout and
- FrameLayout
First of all we need to create a file colors.xml (if not present) in app -> res -> values to define all the necessary colors
colors.xml
<?xml version="1.0" encoding="utf-8"?>
<resources>
    <color name="colorPrimary">#3F51B5</color>
    <color name="colorPrimaryDark">#303F9F</color>
    <color name="colorAccent">#FF4081</color>

    <color name="white">#FFFFFF</color>
    <color name="colorRipple">#A9A9F5</color>
</resources>
Now we need to create a drawable resource file and name it ripple_effect as shown below
Add the below code to your ripple_effect.xml (v21) file (for API level 21)
<?xml version="1.0" encoding="utf-8"?>
<ripple
    xmlns:android="http://schemas.android.com/apk/res/android"
    android:color="@color/colorRipple">     <!-- ripple color -->

    <!-- for Button -->
    <item>
        <shape android:shape="rectangle">
            <corners android:radius="3dp" />
            <solid android:color="@color/colorPrimary"/>
        </shape>
    </item>

</ripple>
Add the below code to your ripple_effect.xml file (for API level below 21)
<?xml version="1.0" encoding="utf-8"?>
<selector xmlns:android="http://schemas.android.com/apk/res/android">

    <item android:state_pressed="true">
        <shape android:shape="rectangle">
            <corners android:radius="3dp" />
            <solid android:color="@color/colorRipple" />
        </shape>
    </item>
    <item android:state_focused="true">
        <shape android:shape="rectangle">
            <corners android:radius="3dp" />
            <solid android:color="@color/colorPrimary" />
        </shape>
    </item>
    <item>
        <shape android:shape="rectangle">
            <corners android:radius="3dp" />
            <solid android:color="@color/colorPrimary" />
        </shape>
    </item>

</selector>
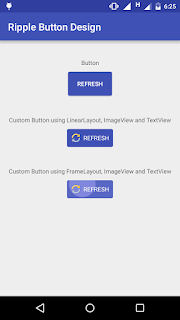
Now add a Button, LinearLayout and FrameLayout to your layout file and set background as drawable resource file ripple_effect.xml
Adding Button
<Button
        android:layout_width="wrap_content"
        android:layout_height="wrap_content"
        android:text="@string/refresh"
        android:textColor="@color/white"
        android:layout_gravity="center_horizontal"
        android:background="@drawable/ripple_effect" />
Adding LinearLayout
    <LinearLayout
        android:id="@+id/llInviteOthers"
        android:layout_width="wrap_content"
        android:layout_height="wrap_content"
        android:layout_gravity="center_horizontal"
        android:padding="8dp"
        android:clickable="true"
        android:background="@drawable/ripple_effect">

        <ImageView
            android:layout_width="20dp"
            android:layout_height="20dp"
            android:src="@mipmap/ic_refresh"/>

        <TextView
            android:layout_width="wrap_content"
            android:layout_height="wrap_content"
            android:text="@string/refresh"
            android:layout_marginLeft="5dp"
            android:layout_marginStart="5dp"
            android:textColor="@color/white"
            android:layout_gravity="center_vertical"/>

    </LinearLayout>
Adding FrameLayout
    <FrameLayout
        android:layout_width="wrap_content"
        android:layout_height="wrap_content"
        android:layout_gravity="center_horizontal"
        android:padding="8dp"
        android:clickable="true"
        android:background="@drawable/ripple_effect">

        <ImageView
            android:layout_width="20dp"
            android:layout_height="20dp"
            android:src="@mipmap/ic_refresh"/>
        <TextView
            android:layout_width="wrap_content"
            android:layout_height="wrap_content"
            android:text="@string/refresh"
            android:layout_marginLeft="25dp"
            android:layout_marginStart="25dp"
            android:textColor="@color/white"
            android:layout_gravity="center_vertical"/>

    </FrameLayout>
Preview Screens


Very nice tutorial. keep sharing <a href="http://blog.nkdroidsolutions.com/android-ripple-effect-example-code/" target="_blank" rel="dofollow”></a>
ReplyDeleteIt is evident from your code that different button states can have different colors, but in ripple drawable you have not mentioned any states to provide different colors. How is this handled in a ripple tag?
ReplyDeleteif you have a constrant layout, this seem not to work am i missing something?
ReplyDeleteI wanted to thank you for this great read!! I definitely enjoying every little bit of it I have you bookmarked to check out new stuff you post.is article.
ReplyDeleteangularjs online training
apache spark online training
informatica mdm online training
devops online training
aws online training
A universal message I suppose, not giving up is the formula for success I think. Some things take longer than others to accomplish, so people must understand that they should have their eyes on the goal, and that should keep them motivated to see it out til the end.
ReplyDeleteMicrosoft Azure online training
Selenium online training
Java online training
Python online training
uipath online training
I feel really happy to have seen your webpage and look forward to so many more entertaining times reading here. Thanks once more for all the details.
ReplyDeleteDevops Course Training in Chennai |Best Devops Training Institute in Chennai
Selenium Course Training in Chennai |Best Selenium Training Institute in Chennai
Java Course Training in Chennai | Best Java Training Institute in Chennai
I enjoy what you guys are usually up too. This sort of clever work and coverage! Keep up the wonderful works guys I’ve added you guys to my blog roll.
ReplyDeleteAWS Course Training in Chennai |Best AWS Training Institute in Chennai
Devops Course Training in Chennai |Best Devops Training Institute in Chennai
Selenium Course Training in Chennai |Best Selenium Training Institute in Chennai
Java Course Training in Chennai | Best Java Training Institute in Chennai
Your very own commitment to getting the message throughout came to be rather powerful and have consistently enabled employees just like me to arrive at their desired goals.
ReplyDeleteBest PHP Training Institute in Chennai|PHP Course in chennai
Best .Net Training Institute in Chennai
Dotnet Training in Chennai
Dotnet Training in Chennai
Thanks for your information's...IT sector has an Very god opinion about Java...looking towards to explore more about JAVA visit here and Grasp it...
ReplyDeleteJava training in chennai | Java training in annanagar | Java training in omr | Java training in porur | Java training in tambaram | Java training in velachery
This is excellent information. It is amazing and wonderful to visit your site.Thanks for sharing this information,this is useful to me. I am reading your post from the beginning, it was so interesting to read & I feel thanks to you for posting such a good blog, keep updates regularly.
ReplyDeleteJava Training in Chennai
Java Training in Velachery
Java Training in Tambaram
Java Training in Porur
Java Training in OMR
Java Training in Annanagar
Android code example
ReplyDelete