Log4j Overview
Log4j is java based fast reliable and flexible logging framework distributed under the Apache Software License. log4j is highly configurable through external configuration files at runtime.
Benefit of Logging
Logging is an important component of the software development. A well-written logging code offers quick debugging, easy maintenance, and structured storage of an application's runtime information.
log4j has three main components:
1. loggers: Responsible for capturing logging information.
2. appenders: Responsible for publishing logging information to various preferred destinations.
3. layouts: Responsible for formatting logging information in different styles.
2. appenders: Responsible for publishing logging information to various preferred destinations.
3. layouts: Responsible for formatting logging information in different styles.
Log4j Logging levels
OFF The highest possible rank and is intended to turn off logging.
ALL All levels including custom levels.
FATAL Very Severe errors that cause premature termination.
ERROR Errors or unexpected conditions that may allow application to continue running.
WARN Situations that are undesirable or unexpected, but not necessarily "wrong".
INFO Informational messages that highlight the progress of the application.
DEBUG Detailed information on the flow that are most useful to debug an application.
TRACE Most detailed information than the DEBUG.
Configuration
Log4j can be configured using a properties file or xml file externally. In this example we'll use properties file.
Log4j Sample Project
We're going to create a simple example project of Log4j using Eclipse IDE to log the information in Console, File and Database. Below is the preview of logging in file
 |
| File Preview of Logging using Log4j |
To create the Log4j project we'll follow below steps:
Step 1: Create a maven project
Open Eclipse IDE
Click on File -> New -> Project
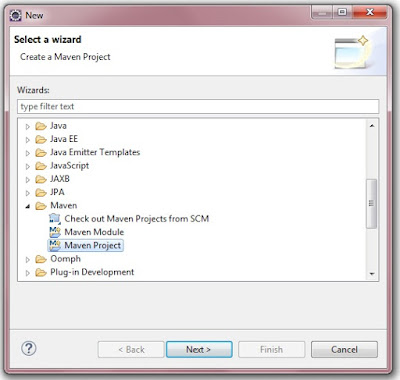
Expand Maven and Select Maven Project and click on the Next button
Click on File -> New -> Project
Expand Maven and Select Maven Project and click on the Next button
 |
| Select a wizard for Maven Project |
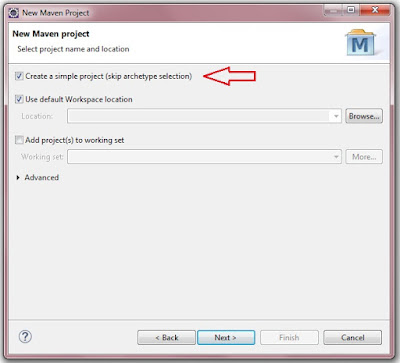
Check the checkbox Create a simple project and click on the Next button
 |
| Create a Simple Maven Project |
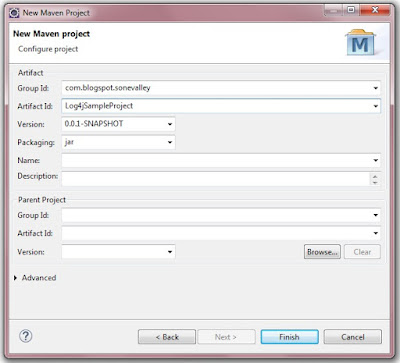
Specify the Group Id and Artifact Id as shown in the below image and click on the Finish button
 |
| Specify Group Id and Artifact Id for Maven Project |
Your Maven Project has been created.
Step 2: Add Maven Dependencies
pom.xml
<project xmlns="http://maven.apache.org/POM/4.0.0" xmlns:xsi="http://www.w3.org/2001/XMLSchema-instance"
 xsi:schemaLocation="http://maven.apache.org/POM/4.0.0 http://maven.apache.org/xsd/maven-4.0.0.xsd">
 <modelVersion>4.0.0</modelVersion>
 <groupId>com.blogspot.sonevalley</groupId>
 <artifactId>Log4jSampleProject</artifactId>
 <version>0.0.1-SNAPSHOT</version>

 <dependencies>

  <dependency>
   <groupId>log4j</groupId>
   <artifactId>log4j</artifactId>
   <version>1.2.17</version>
  </dependency>

  <dependency>
   <groupId>mysql</groupId>
   <artifactId>mysql-connector-java</artifactId>
   <version>5.1.6</version>
  </dependency>

 </dependencies>

</project>
Step 3: Create Packages and Files
Now you have to create a Main Class and a properties file as shown in the below image
 |
| Log4j Project Explorer |
MainApp.java
package com.blogspot.sonevalley;

import org.apache.log4j.Logger;

public class MainApp {

 final static Logger logger = Logger.getLogger(MainApp.class);

 public static void main(String args[]) {

  MainApp app = new MainApp();
  app.generateLog("myLogger");
 }

 private void generateLog(String parameter) {

  if (logger.isDebugEnabled()) {
   logger.debug("This is debug : " + parameter);
  }

  if (logger.isInfoEnabled()) {
   logger.info("This is info : " + parameter);
  }

  if(logger.isTraceEnabled()) {
   logger.trace("This is trace : " + parameter);
  }

  logger.warn("This is warn : " + parameter);
  logger.error("This is error : " + parameter);
  logger.fatal("This is fatal : " + parameter);
 }
}
log4j.properties
The log4j.properties file is a log4j configuration file. By default, the LogManager looks for a file named log4j.properties in the CLASSPATH.
# Root logger option
log4j.rootLogger = DEBUG, stdout, file, DB

# ============================================================================================
# Redirect log messages to console

# Define the console appender
log4j.appender.stdout=org.apache.log4j.ConsoleAppender

log4j.appender.stdout.Target=System.out

# Define the layout for console appender
log4j.appender.stdout.layout=org.apache.log4j.PatternLayout

# Set the console layout pattern.
log4j.appender.stdout.layout.ConversionPattern=%d{yyyy-MM-dd HH:mm:ss} %-5p %c{1}:%L - %m%n

# ============================================================================================
# Redirect log messages to a log file, support file rolling when the file reaches MaxFileSize.

# Define the file appender
log4j.appender.file=org.apache.log4j.RollingFileAppender

# Set log file path
log4j.appender.file.File=C:\\log4j-application.log

# Set max size of the log file
log4j.appender.file.MaxFileSize=5MB

# Set max backup index
log4j.appender.file.MaxBackupIndex=10

# Define the layout for file appender
log4j.appender.file.layout=org.apache.log4j.PatternLayout

# Set the file layout pattern.
log4j.appender.file.layout.ConversionPattern=%d{yyyy-MM-dd HH:mm:ss} %-5p %c{1}:%L - %m%n

# ============================================================================================
# Store log messages to a DB

# Define the DB appender
log4j.appender.DB=org.apache.log4j.jdbc.JDBCAppender

# Set JDBC URL
log4j.appender.DB.URL=jdbc:mysql://localhost/my_db

# Set Database Driver
log4j.appender.DB.driver=com.mysql.jdbc.Driver

# Set database user name and password
log4j.appender.DB.user=root
log4j.appender.DB.password=root

# Set the SQL statement to be executed.
log4j.appender.DB.sql=INSERT INTO LOGS VALUES('%d{yyyy-MM-dd HH:mm:ss}','%p','%c','%t','%L','%m')

# Define the layout for DB appender
log4j.appender.DB.layout=org.apache.log4j.PatternLayout
Step 3: Run the Project
To run the project right click on MainApp.java in the Project Explorer and select
Run As -> Java Application
Run As -> Java Application
 |
| Log4j Console Logging |
 |
| Log4j File Logging |
 |
| Log4j DB Logging |
Clone or Download Project from GitHub
Look for Log4jSampleProject Under Miscellaneous-Examples Repository
Happy to found this blog. Good Post!. It was so good to read and useful to improve my knowledge as updated one, keep blogging. Hibernate Training in Electronic City
ReplyDeleteJava Training in Electronic City